
Making and editing videos on the move is one of those things that no longer surprises us. What surprises us is the variety of instruments available. No firm, no matter how big or little, can avoid video in digital marketing. Video is a must. So let’s look at one of the better possibilities accessible today. Pro Video Editor – Kinemaster
Free vs Subscription
Kinemaster is a free programme, however your films will be watermarked. For Android users, there is a hack that eliminates the watermark on a per-use basis. This hack does not work on iPhones. A year’s membership includes a 7-day free trial.
Getting Started with Kinemaster
While the app UI seems almost same on iOS and Android, it differs significantly from the interface of other applications, which varies significantly between operating platforms. Allow me to show you what the Kinemaster interface looks like in more detail:
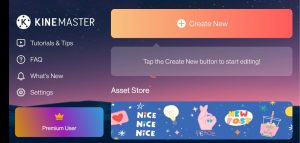
Landing Screen
Upon using the Kinemaster App for the first time, you are greeted with a landing screen where you can view any past projects you have worked on, as well as buttons to start a new project as well as buttons to obtain assistance, browse the Kinemaster YouTube channel, and access the app’s settings.
The Main Settings Tab
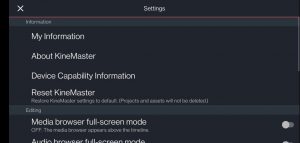
The settings tab is located on the main landing page and is represented by a gear symbol. To configure certain behind-the-scenes settings for your application, click on this button. You may manage your subscription status as well as a few other choices from this page. The iOS and Android versions of the app have somewhat different settings, but the most of them are the same. The main differences are the options for editing, sorting, and file locations.
Starting a New Project
From the landing page, you have the option of continuing to work on a current project or starting a new one entirely. When you select to start a new one, the app will prompt you to pick whether you want to create a horizontal, vertical, or rectangular video. Make an informed decision since you will not be able to alter your mind afterwards. Also, be certain that the clips you want to utilize are in that format; otherwise, you will have to zoom in and out to match the aspect ratio of the video.
The Editing Interface
The editing interface is quite similar to the interface of many other video editing programmes. Let’s go through the controls in further detail.
The Video Window. The video window is located in the middle of the screen, as is common with most video editing applications. On the other hand, when you click on the Timeline button on your Control Bar, the video window is moved to the left-hand side of the screen.
Media Circle. The media circle may be seen at the top right of the screen on the left side. You may add new media, music, effects, and layers directly from the media bar. The capture button is represented by the red circle within the media circle. This means that you may record video on your phone directly from the app. You may also use your microphone to capture audio in addition to video.
Advanced Settings. Instead of the media circle, the advanced editing tools display when a video or audio clip is chosen. For a smartphone application, the quantity of editing choices is extremely astounding.
Timeline. Unless you click on the timeline button on the control bar, the timeline will be shown in a wider area to the right of the screen, pushing the video window to the left. It is possible to arrange layers on the timeline in terms of their effects, titles, b-roll clips, and audio tracks. The main clip layer is the initial and uppermost layer in the hierarchy. The clips in this layer are constantly next to one another, and there are never any gaps between the clips in this layer. By rearranging the clips in the layers below, you may control when new clips appear in the scene and how quickly they appear.
Editing Workflow:
Having your material available in your picture or video files is essential when using Kinemaster on iOS. Apps such as Dropbox and Google Photos are not integrated with the service. In order to begin a Kinemaster project, it is important to arrange your clips and photographs first. Connecting to Google Drive is possible on Android devices..
It’s simple to add files. You will be asked if you want to add the image as a clip or as a layer when you add pictures, video, or music to your project. Add as a clip will move it to the top layer, but adding it as a layer will establish a whole new level of organization.
Making a clip is as simple as clipping it and cutting it. You can also move it around, reverse it, and change the pace of the clip. Clipping possibilities are really pretty sophisticated. With the standard split at the playhead option, you have the choice of trimming either to the left or right of where the playhead is situated. The clips quickly cling together as you cut, eliminating any remaining empty spots.
It is simple to include effects such as colour grading filters and other creative filters. Simply choose a clip and then select one of the editing choices from the editing tabs. If you don’t find what you’re looking for in the default list, you may browse the marketplace for other options.
Transitions may be applied by tapping the addition symbol (+) between clips, and there are several possibilities available. On the same way, you might look for further transition possibilities in the marketplace.
It will take over the scene until you apply an opacity filter or another form of effect after you have added a clip to a layer below the primary layer. With a little effort, you will be able to create a variety of intriguing and creative effects by layering and applying effects at the same time.
It’s easy to keep track of your progress. Simply hit the play button to keep an eye on the video as you alter it.
Once your video is complete, export it at the appropriate quality or make any necessary adjustments. You may share it on social media, through chat, email, or any other app that you have connected to your device’s sharing features once it has been exported from your computer.
Download Kinemaster:

Download Kinemaster Fonts Installer:


